
 If you are one of our customers (and if you are not, what are you waiting for?), you know the Lightstreamer company is customer driven. Whenever a customer requests a new feature, we do all we can to comply.
So, when a customer asked us if we had a watchOS Client Library on the roadmap, during Fall 2017, we scheduled it for Q1 2018. Now, we are happy to announce it is available and ready for integration in your WatchKit extensions.
The new watchOS SDK derives from the iOS SDK version 4.0.0 and retains the same version number. It includes all the APIs and features of the iOS SDK, with the single exception of WebSocket support (due to limitations of the watchOS platform).
Let's dig into some examples.
Note: if you need download and example pointers, jump directly to the end of the post ("Get the SDK").
Adding a WatchKit Extension to the Stock-List Demo
Our Stock-List Demo for iOS has been updated with a WatchKit Extension, but the previous version has been tagged for reference. Download (or clone, or fork) the previous version and follow us in this little tutorial.Add the WatchKit Extension via Xcode
First of all, add a WatchKit extension to the project using the Add Target dialog of Xcode, ensure the Include Notification Scene is not selected, and name the extension something fancy, e.g. StockWatch:


Integrate the iOS and watchOS SDKs Using CocoaPods
The included Podfile looks like this:
use_frameworks!
platform :ios, '8.0'
project 'StockList Demo for iOS.xcodeproj'
target 'StockList Demo for iOS' do
platform :ios, '8.0'
project 'StockList Demo for iOS.xcodeproj'
pod 'Lightstreamer_iOS_Client', '4.0.0'
end
target 'StockWatch Extension' do
platform :watchos, '2.0'
project 'StockList Demo for iOS.xcodeproj'
pod 'Lightstreamer_watchOS_Client', '4.0.0'
end
Now run pod install on your project: CocoaPods will integrate the iOS Client Library on the main app and the watchOS Client Library on the WatchKit extension.
Close the project and reopen it from the workspace. It should build and run correctly both on the Simulator and on the Apple Watch, even if the extension still does nothing.
Integrate the iOS and watchOS SDKs Traditionally
If you don't want to use CocoaPods, you can still integrate the libraries manually by adding them to the project. It just requires a little more of work.Start by downloading the iOS and watchOS libraries from the download links at the end of this article. The included frameworks are rather big files, but consider they include multiple code segments that are then stripped by Apple when the app is distributed via App Store. The final size of the framework in your app will be much smaller.
Drag & drop the libraries in the project's Frameworks group. Make sure the libraries are not automatically added to any target, and that the Copy items if needed flag is selected.
Then proceed as follows:
- Select the iOS app target, go to the General tab, scroll down to Linked Frameworks and Libraries list and drag & drop the Lightstreamer_iOS_Client.framework from the Frameworks group to into the list.
- Select the WatchKit extension target, got to the General tab, scroll down to Embedded Binaries list and drag & drop the Lightstreamer_watchOS_Client.framework from the Frameworks group into the list. This will also automatically add it to the Linked Frameworks and Libraries list.
- Remaining on the WatchKit extension target, switch to the Build Phases tab, add a New Run Script Phase using the "+" button and copy-paste in the following script:
Adding the watchOS SDK framework into the Embedded Binaries list is important: the framework must be bundled with the extension and copied into the Apple Watch device. Adding it only to the Linked Frameworks and Libraries list is not sufficient.
Moreover, the binaries going to be bundled with the extension must be stripped of unnecessary code segments. In the case of our framework, the i386 code segment included for use with the Simulator must be stripped, or the app will not pass App Store validation. The script serves exactly this purpose.
The script we use was originally written by people at Jitsi. We thank them for this little big contribution to the iOS development community.
Before trying to build and run the project, since it was originally thought to be used with CocoaPods, you need to clean it up from its remaining scripts and links:
- In the iOS app target, Build Phases tab, remove the phases whose name begin with "[CP]".
- From the Frameworks group, remove the missing Pods_StockList_Demo_for_iOS.framework.
- Remove the Pods group.
Coding the WatchKit Extension
In this tutorial we will limit the coding phase to showing the current price of a stock-list item on a label. The full source code of the demo on GitHub contains a more thorough interface.
Apps for watchOS are split in two bundles:
- The Watch App, which includes storyboards and statically accessed resources. If you named the extension StockWatch as suggested, in the Xcode Project Navigator this bundle is contained in a group named just StockWatch.
- The WatchKit Extension, which contains code and resources accessed at runtime. In the Xcode Project Navigator it is contained in a group named StockWatch Extension.
Besides having this two parts divided, coding a watchOS app is exactly like coding an iOS app. So, let's start by adding a label on the Watch screen in the Interface.storyboard and binding it to an outlet in the InterfaceController.h source:

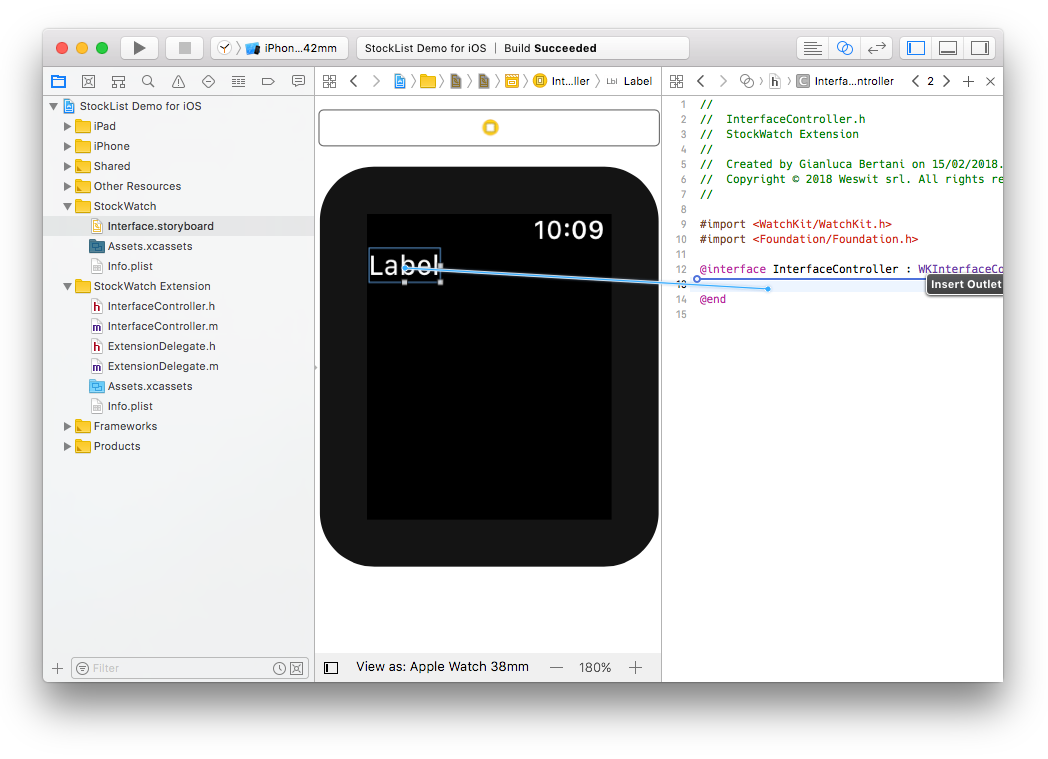
Call the outlet priceLabel. Next, modify che InterfaceController.m source to add the classical steps of a Lightstreamer subscription:
- Create and connect an LSLightstreamerClient instance.
- Create an LSSubscription and subscribe an item.
- Implement the LSSubscriptionDelegate protocol and show the item's current value.
The full implementation for the Interface Controller is as follows:
Here you can see an animation of the iOS Stock-List Demo full interface:

Handling Mobile Push Notifications
Could we forget about push notifications? Of course not. The Stock-List Demo with APNs has also been updated with a WatchKit extension. The extension is identical to the one of the original Stock-List Demo, with the exception of including a controller to show an incoming push notification on the Watch.
To replicate this, Download (or clone, or fork) the previous version of the demo, repeat the steps above to add the iOS and watchOS SDKs and then add a WatchKit target, but this time select the Include Notification Scene flag.
This has the effect of adding a new controller in the WatchKit extension and a couple more scenes to the storyboard in the Watch app:
- The Static Notification Interface Controller, used by the Apple Watch device when it has time or energy constraints. It is not customizable and shows just the message of the push notification.
- The Notification Controller, a.k.a. the dynamic notification controller, which is fully customizable and can show any information carried by the push notification.
Note that the WatchKit extension is able to associate a specific notification controller with a push notification category and show the corresponding controller automatically, when the push notification is received. There's no code to be written to show the controller, you just have to code how the push notification must be represented.
So, open the Interface.storyboard file in the Watch app, select the Static Notification Interface Controller, open the scene tree down to a connection named myCategory and edit the name so that it is STOCK_PRICE_CATEGORY:

This is the category used by push notifications elsewhere in the iOS app. For a reference of where this parameter is set, see the app delegates and the DetailViewController.
Now let's customize the dynamic notification controller with a couple of labels, which we will later bind to fields delivered with the push notification. Add two labels and bind them to two outlets in the Notification Controller named nameLabel and priceLabel:


Before implementing the Notification Controller, we need to ensure that any push notification sent via the Lightstreamer MPN Module includes the pair of fields we want to show in the two labels, i.e. the stock name and its last price.
MPN subscriptions are set up in the DetailViewController, as mentioned before. In particular:
- In the event mpnSwitchDidChange we activate the price MPN subscription. It sends a push notification each time the price changes.
- In the event addOrUpdateMPNSubscriptionForThreshold:greaterThan: we activate the triggering MPN subscription. It sends a push notification when the price rises above or drops below a certain threshold.
In both cases we need to add the fields we want to show in the Notification Controller. So where we specify the customData segment of the MPN, we modify the code from this:
[builder sound:@"Default"];
[builder badgeWithString:@"AUTO"];
[builder customData:@{@"item": item}];
[builder category:@"STOCK_PRICE_CATEGORY"];
[builder sound:@"Default"];
[builder badgeWithString:@"AUTO"];
[builder customData:@{@"item": item,
@"stock_name": @"${stock_name}",
@"last_price": @"${last_price}"}];
[builder category:@"STOCK_PRICE_CATEGORY"];
Now we can implement the Notification Controller. The full implementation is as follows:
Xcode also provides a convenient way to test the Notification Controller: just edit the PushNotificationPayload.apns file with the payload you are supposed to receive, and then run the StockWatch (Notification) scheme. For example, copy-paste the following payload:
The Simulator will bring up the Notification Controller as if a push notification with payload was just received. Practical, isn't it?
Here you can see an animation of the iOS Stock-List Demo with APNS full interface:

Conclusions
This tutorial for the watchOS SDK is unusually detailed, but the integration of a WatchKit extension in an iOS app is so easy that we felt that telling the whole story, instead of just the Lightstreamer APIs part, would have done a better job.Let us know your thoughts at support@lightstreamer.com, and enjoy coding with Lightstreamer and WatchKit.
References
For more information on the topics discussed in this tutorial, please refer to:- Mobile Push Notifications with Lightstreamer Server 7.0 and Client SDKs 4.0
- Lightstreamer SDKs API Reference: see "Get the SDK" box below.
- Apple's WatchKit Programming Guide
Get the SDK
Lightstreamer Client Library for watchOS version 4.0.0
Requirements
- Requires Lightstreamer Server version 7.0 b2 or greater
- Includes 32 bit and bitcode segments (plus i386 segments for use with the simulator)
- Requires watchOS version 2.0 or greater
- Requires linking with the following frameworks and libraries: Security.framework, iconv
- Requires ARC
Download Links
SDKs for Additional Apple Platforms
Lightstreamer Client Library for iOS version 4.0.0
Requirements
- Requires Lightstreamer Server version 7.0 b2 or greater
- Includes 32 bit, 64 bit and bitcode segments (plus i386 and x64 segments for use with the simulator)
- Requires iOS version 8.0 or greater
- Requires linking with the following frameworks and libraries: SystemConfiguration.framework, Security.framework, iconv
- Requires ARC
Download Links
Lightstreamer Client Library for macOS version 4.0.0
Requirements
- Requires Lightstreamer Server version 7.0 b2 or greater
- Requires macOS version 10.9 or greater
- Requires linking with the following frameworks and libraries: SystemConfiguration.framework, Security.framework, iconv
- Requires ARC
Download Links
Lightstreamer Client Library for tvOS version 4.0.0
Requirements
- Requires Lightstreamer Server version 7.0 b2 or greater
- Includes 64 bit and bitcode segments (and x64 segment for use with the simulator)
- Requires tvOS version 9.0 or greater
- Requires linking with the following frameworks and libraries: SystemConfiguration.framework, Security.framework, iconv
- Requires ARC
No comments:
Post a Comment
Note: Only a member of this blog may post a comment.